A patient experiencing severe respiratory distress can rapidly deteriorate to Respiratory Arrest.
Respiratory Arrest simply means cessation of breathing.
Per ACLS definition, respiratory arrest typically means that a patient’s respirations are completely absent or inadequate to maintain oxygenation, but a pulse is present.
Management of respiratory arrest includes the following interventions:
Give oxygen
Open the airway
Provide basic ventilation
Provide respiratory support with the use of artificial airways (OPA and NPA)
Suction to maintain a clear airway
Maintain airway with advanced airways
During respiratory arrest, the ACLS provider who is providing ventilation with the ambu bag should avoid hyperventilation of the patient. Hyperventilation is providing too many breaths per minute or too large of a volume per breath during ventilation. Hyperventilation may lead to increased intrathoracic pressure, decreased venous return to the heart, diminished cardiac output, and increased gastric inflation, all of which can decrease the likelihood of positive outcomes.
Preparing to Intubate
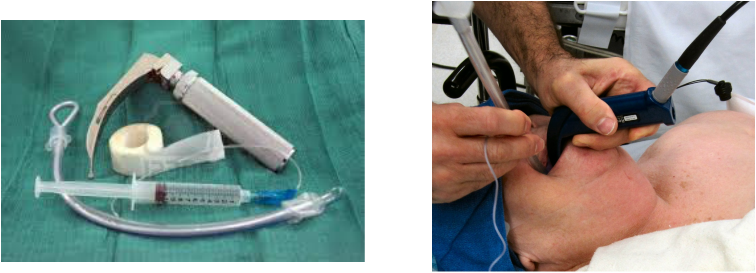
Equipment Needed:
~ Gloves ~ Sterile gloves ~ Assorted oral airways
~ Ambu bag ~ Suction set up ~ Stethoscope
~ Stylet ~ 10 cc syringe ~ C02 detector
~ Laryngoscope - handle and various blades
~ Endotracheal tubes of various sizes
~ 1 inch tape or securing device
Medication: the MD will often order sedation and a neuromuscular blockade for intubation
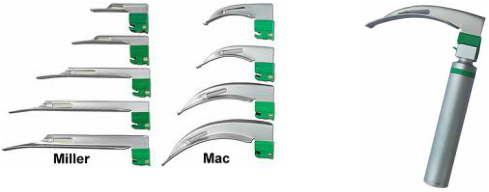
Laryngoscope: The laryngoscope is comprised of 2 separate parts; a handle which contains a light source and a blade. Blades are either curved (MacIntosh) or straight (Miller):

Endotracheal tubes (ETT): They are sized by either the internal diameter (2.5 to 10 mm) or the external diameter with sizes 2-9 French (Fr). The most common ETT used for adults is size 7 to 9 Fr.
Smaller size ETTs are easier to insert; however the larger size tubes have less airway resistance and allow for better suctioning and less work of breathing.

A stylet can be inserted inside the ETT to help the tube conform to the airway and may facilitate insertion into the larynx and trachea.
However, stylets have been associated with pharyngeal or laryngeal trauma.
However, stylets have been associated with pharyngeal or laryngeal trauma.
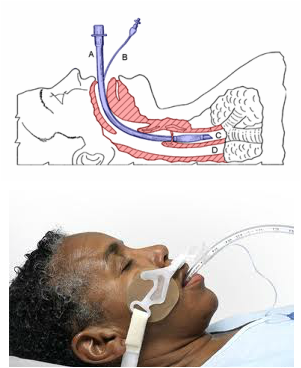
Diagram of an endotracheal tube that has been inserted into the trachea:
A. endotracheal tube
B. cuff inflation tube with pilot balloon
C. trachea
D. esophagus
A secured ET tube using a commercial ET tube securing device.
Overview of Preparation and Procedure:
** Note: The Sellick maneuver can be used to facilitate intubation and reduce the risk of aspiration. The technique requires an assistant to apply pressure to the cricoid member posteriorly. The cricoid cartilage is held firmly between the finger and thumb. It is then pressed posteriorly so that the esophagus can be compressed between the horizontal portion of the cartilage and cervical spine.
Post Intubation Concerns and Responsibilites:
- Prior to performing intubation, all equipment, medication, emergency supplies, and support staff should be in place.
- Patients should be monitored before, during and after intubation for blood pressure, heart rate, and pulse oximetry.
- All equipment should be checked including assembling the laryngoscope to verify a proper light source.
- If a stylet is used it should be inserted into the ETT with a water soluble lubricant. The end should then be bent to facilitate intubation, ensuring that the style does not protrude the end of the ETT. The balloon should be checked by inflating 10 cc of air with a syringe.
- An additional ETT (one size smaller), stylet, and laryngoscope should be readily available prior to attempting intubation.
- The patient should be prepared by removing any dental appliances (ex. dentures).
- Proper sedation (and neuromuscular blockers, if used) administered.
- The patient must be positioned so that easy access is obtained. The head is placed in the “sniffing position” with the lower portion of the cervical spine flexed.
- Reoxygenation is then performed with 100% oxygen for 2 to 3 minutes via bag-mask ventilation.
- If intubation is delayed, no more than 30 seconds should pass without ventilation.
- If intubation is not performed within this time period, the procedure should be stopped and the patient ventilated with bag-mask ventilation prior to reattempting the procedure.
** Note: The Sellick maneuver can be used to facilitate intubation and reduce the risk of aspiration. The technique requires an assistant to apply pressure to the cricoid member posteriorly. The cricoid cartilage is held firmly between the finger and thumb. It is then pressed posteriorly so that the esophagus can be compressed between the horizontal portion of the cartilage and cervical spine.
Post Intubation Concerns and Responsibilites:
- To assess proper placement of the ETT, the chest and abdomen are inspected for movement.
- Symmetric movement of the thorax with minimal movement of the abdomen should be seen with each ventilation.
- Breath sounds should first be assessed over the epigastric area and then over left and right lung fields. ** Note: If breath sounds are heard over the epigastric area only, it is likely that an esophageal intubation has occurred.
- Equal breath sounds are typically heard bilaterally with proper endotracheal intubation.
- If breath sounds are heard over one hemithorax, but are diminished or absent over the other hemithorax, the tube should be left in place. The ETT should be withdrawn 2-3 cm and chest auscultated to check breath sounds again. A common complication of intubation is right main stem intubation.
- Since the right main stem bronchus has a straighter alignment with the trachea than the left main stem bronchus, an ETT advanced too far will typically enter the right main stem bronchus.
- ETT placement can also be confirmed by use of an end-tidal CO2 monitoring device.
- A stat chest x-ray should always be done to confirm ETT placement.
- Most all patients that are intubated, are restrained with soft-wrist restraints and sedated to maintain airway protection; Follow the physicians orders.
